The Basics of Soap-Making: A Guide to Cold-Processed Soap with Budget-Friendly Ingredients
Discover the art of soap making with our comprehensive guide. Learn the essential steps, tips, and tricks for crafting your own natural, handmade soap at home. Perfect for beginners and DIY enthusiasts!
SKINCARE
Kathrine-Anne Hill
8/22/20245 min read


Affiliate Disclaimer:
Please note that some of the links in this article are affiliate links. This means that if you click on these links and make a purchase, I may receive a small commission at no additional cost to you. This commission helps support the maintenance and growth of this website and allows me to continue providing valuable information and recommendations. Rest assured, I only recommend products and services that I have personally used or thoroughly researched. Your support is greatly appreciated!
Introduction to Cold-Processed Soap-Making
Cold-processed soap-making is a traditional and time-honored method that has been cherished for centuries due to its simplicity and effectiveness. This technique allows for greater control over ingredients, enabling the soap maker to customize soaps for different skin types and preferences. By blending a carefully measured combination of oils, lye, and other additives, cold-processed soap enthusiasts can craft unique bars that meet specific needs and preferences.
One of the main advantages of cold-processed soap-making is customization. Whether seeking a gentle bar for sensitive skin, a soap infused with essential oils, or one with exfoliating properties, cold-processing provides the flexibility to tailor soaps precisely to individual requirements. This control not only enhances the quality of the soap but also ensures that every bar is free from unwanted chemicals and additives commonly found in commercially produced soaps.
The historical roots of soap-making date back thousands of years, with evidence of ancient civilizations utilizing various methods to produce soap for hygiene and medicinal purposes. The resurgence of interest in DIY soap-making can be traced to a growing awareness of natural and sustainable living practices. As more people become conscious of the ingredients in their personal care products, cold-processed soap-making has gained popularity among hobbyists and home-based entrepreneurs. This method stands out in the homemade soap community for its straightforward approach and ability to produce high-quality, artisanal soaps.
Another significant benefit of cold-processed soap-making is its budget-friendly nature. The ingredients required are often simple, accessible, and inexpensive. Common oils such as olive, coconut, and palm oil can be sourced economically, and most essential additives like natural colorants, fragrances, and exfoliants are readily available. Aspiring soap makers find the process rewarding not only for the tangible results but also for the creative satisfaction of transforming basic ingredients into a personal, handcrafted product. Using cost-effective materials enables individuals to produce excellent quality soap without the financial burden of high-end skincare products.
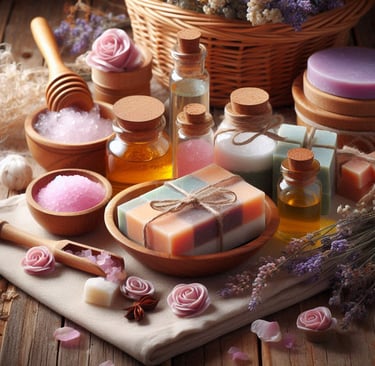
Cold-processed soap-making requires a careful selection of essential ingredients and tools, all of which need to be both cost-effective and readily available. At the core of any soap recipe are the oils, which comprise the fundamental base of the soap. Olive oil, renowned for its moisturizing properties, and coconut oil, valued for its ability to produce a rich lather, are among the most commonly used oils. Both are widely accessible and affordable, making them staples for budget-conscious soap-makers. Another economical option includes canola oil, which balances quality with cost efficiency. Moreover, the inclusion of vegetable shortening and palm oil can further stretch the budget without compromising the final product's quality.
A pivotal component in the soap-making process is lye, chemically known as sodium hydroxide. It serves as a fundamental factor in the saponification process, where fats and oils transform into soap. Although lye may seem intimidating, it is readily available both online and in hardware stores. To ensure safety and measure precision, utilizing a digital kitchen scale is crucial for achieving accurate lye and oil ratios.
Distilled water is another key ingredient, used to dissolve the lye and aid in the soap's formation. Ordinary tap water contains minerals and impurities that may interfere with the soap's consistency, thus distilled water is recommended. Optional ingredients, such as fragrances and colorants, are not necessary but can enhance the aesthetic and sensory appeal of the soap. Affordable essential oils, found at health food stores or ordered online, and natural colorants, like turmeric or cocoa powder, can be cost-effective choices for those looking to add personal touches to their creations.
A suite of basic tools is also required for a successful soap-making endeavor. Mixing bowls, preferably made of stainless steel or heat-resistant plastic, are necessary for combining ingredients. A digital thermometer ensures the proper temperature alignment of the lye solution and oils. A stick blender proves invaluable for achieving a smooth trace. Soap molds, which can range from disposable plastic containers to silicone baking molds, provide shape and structure. Finally, safety gear is non-negotiable; gloves and goggles protect against lye's caustic nature, emphasizing the importance of safety throughout the soap-making process.
Step-by-Step Instructions and a Base Recipe for All Skin Types
Making cold-processed soap begins with ensuring you have all the necessary materials and ingredients ready. Start by measuring the lye and water. It's crucial to use a precise scale for this purpose. Begin by pouring the water into a heat-safe container, then slowly add the lye to the water, never the other way around. Stir the mixture gently until the lye is completely dissolved. This solution can reach temperatures upwards of 200°F, so handle it carefully and allow it to cool until it reaches about 100-110°F.
Next, measure your oils. A balanced combination typically includes olive oil for moisturizing properties, coconut oil for cleansing and lather, and palm oil for further lather and hardness. In a separate container, melt the solid oils, such as coconut and palm oil, and then add the liquid oils. Aim for a temperature between 100-110°F for the combined oils as well.
Base Recipe
Olive oil 375g (50%) Lye 104.16g
Coconut oil 187.5g (25%) Water 258.19g
Palm oil 187.5g (25%)
This recipe will make approximately a 2lb. loaf
🛍️ Stunning Rose Loaf Mold - 3D Flower Silicone Embossing - Rectangle Soap & Resin Casting - Perfect for DIY Candle Making - UV Resin Ready - Handmade Craft Essential🎉 Coupon price[CA$15.48]66.71-76%👉 item link: https://temu.to/m/uekgk8x0219
⭐️Click the link https://temu.to/m/uea3cjokc4a to get 💰CA$100 coupon bundle or ⭐️ Search acd975411 on the Temu App to get 💰30% off discount !!Another surprise for you! Click https://temu.to/m/udnnfc2na2q or Search SEC893794 to earn with me together🤝!
When both the lye solution and the oils are within the desired temperature range, it's time to blend them. Slowly pour the lye solution into the oils and begin mixing with an immersion blender. Blend until the mixture thickens to a "trace," meaning it leaves a visible trail or trace when dripped from the blender back into the mixture.
Once trace is achieved, pour the mixture into soap molds. Smooth the top with a spatula and cover with a lid or plastic wrap. Allow the soap to sit for 24-48 hours in a warm, undisturbed place. After this period, gently remove the soap from the molds and cut into bars. Place the bars on a rack and let them cure in a well-ventilated area for 4-6 weeks to ensure they harden and become safe for use.
Safely handling lye is paramount. Always wear protective gear like gloves, goggles, and long sleeves. Work in a well-ventilated area to avoid inhaling fumes.
To customize this base recipe, consider adding essential oils, natural exfoliants like oatmeal or coffee grounds, and natural colorants such as turmeric or spirulina. These additions can create personalized soap bars that appeal both aesthetically and functionally.
Store your finished soap in a cool, dry place to extend its shelf life. Properly cured and stored, your handmade soap will offer a luxurious, skin-friendly alternative to commercial options.